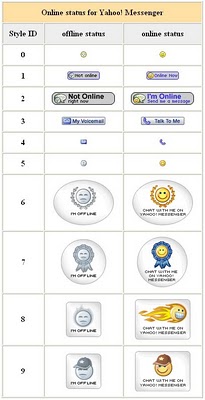
This is the style ID of yahoo! messenger icon :
Allright, to placed the yahoo! messenger icon just place this code at your sidebar :
<a href="ymsgr:addfriend?YOURID"><img src="http://opi.yahoo.com/online?u=YourID&m=g&t=StyleID" border="0"></a> For example. If your yahoo ID is xxxxx@yahoo.com, your ID is xxxxx, So the code for yahoo! messenger icon with choice Style ID 9 is as follows :
<a href="ymsgr:addfriend?balakasadut24"><img src="http://opi.yahoo.com/online?u=balakasadut24&m=g&t=9" border="0"></a> Now, how to place the code to your blog. Follow the teps : - Login to blogger with your ID.
- After entering the dasboard page , click Layout.
- Click at Page Element tab.
- Click at Add a Page element.
- After emerging pop up window , click add to blog button for the things HTML/JavaScript.
- Copy and paste the code below into available column :
- Change YOURID with your yahoo ID and StyleID with number of your choice.
- Click

- Finish. Please see the result.
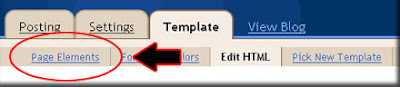


 tab, don't at
  tab. This is the codes :

